

The quick version
Give everyone a three-hex starter habitat. Build a four-pair display of habitat tiles and animal tokens. On your turn, resolve duplicate animals, take one pair, add the tile beside your landscape, and put the animal on any empty tile showing its species. Filling a keystone earns a nature token that can change a future draft. After 20 turns each, add wildlife points, your largest connected area of each of the five habitats, habitat bonuses and unused nature tokens. Highest total wins; tied totals favor the most unused nature tokens, then a shared win.
Saved on this device only — clearing your browser's cache or site data removes them (no account backup).
Give each landscape room to grow
Use the original English Cascadia base game from Flatout Games and AEG, following the publisher's base-game booklet. Keep Landmarks expansion pieces and cards, Rolling games, Junior and other stand-alone versions separate. The base box has 85 ordinary habitat tiles, including 25 keystones; five large three-hex starter habitats; 100 wooden wildlife tokens, 20 of each species; 25 nature tokens; 21 wildlife scoring cards; a cloth bag; and a scorepad. Bring a pen, or use paper and a pen if the pad is exhausted.
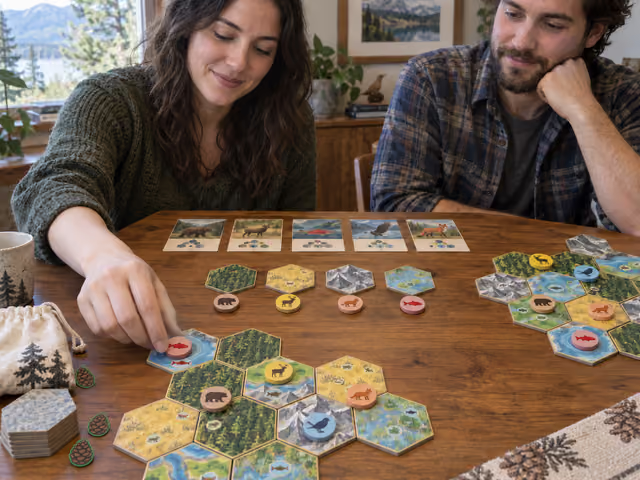
Set up indoors on a shared table. Leave room for each person's starter plus 20 additional hexes, with no overlapping landscapes. Put all 100 wildlife tokens in the bag and mix them. Without looking at tile faces, randomly select 43 ordinary habitat tiles for two players, 63 for three, or 83 for four. Shuffle those tiles into face-down stacks; return the rest to the box. The starter habitats are separate and do not count toward those numbers.
Place the five wildlife cards marked A face up where everyone can read them: one each for bear, elk, salmon, hawk and fox. Return all other scoring cards to the box. Randomly give each player one starter habitat, face up, initially without animal tokens. Put unused starters away. Set the nature-token supply nearby; nobody starts with a nature token.
Reveal four ordinary habitat tiles in a row. Draw four animals from the bag and put one below each tile, in order, to make four fixed pairs. The animal does not have to match the tile beside it: you will place the two pieces independently. Select the first player randomly, an option allowed by the booklet, then take turns clockwise. Read the five scoring patterns below before drafting.
Know what the five A cards reward
Animals are adjacent when their habitat hexes share an edge; touching only at a corner is insufficient. The terrain beneath an animal does not change its wildlife scoring pattern. Count tokens, not the small printed animal icons: those icons only tell you what may be placed on an empty tile.
- Bears: make separate groups of exactly two adjacent bears. A pair must touch no other bear. Count all qualifying pairs together: one, two, three or four-plus pairs score 4, 11, 19 or 27 points total. A lone bear or a connected group of three or more contributes zero on A. There is no penalty for a lone bear, and you cannot split a larger bear group into pairs.
- Elk: make straight lines along one of the hex grid's three axes. Each line of one, two, three or four elk scores 2, 5, 9 or 13. You may divide a longer line or connected arrangement into separate straight groups of up to four to get the best total, but each elk scores in only one group. Groups may touch. A five-elk line can score as a line of three plus a line of two: 9 + 5 = 14.
- Salmon: make connected runs where each salmon touches at most two other salmon. A run may bend; even a closed triangle of three qualifies because each touches only two. A qualifying run of one, two, three, four, five, six or seven-plus scores 2, 5, 8, 12, 16, 20 or 25 points. Score each separate run. Avoid giving a salmon a third salmon neighbor if you want that run to score. Branching is legal but changes scoring; you can return an unwanted token to the bag instead. See the scoring clarification in Host for an accidental branch.
- Hawks: count only hawks with no adjacent hawk. One through eight-plus qualifying hawks score 2, 5, 8, 11, 14, 18, 22 or 26 points total. Hawks next to each other do not qualify; being beside other species is fine. A does not require sight lines.
- Foxes: score each fox separately: one point per different animal species in its six neighboring hexes, up to five points. Another fox counts as one species. Two neighboring bears still contribute only one species. One animal can help score several different foxes; the fox itself is not its own neighbor.
Keep the cards visible throughout play. The A cards fix the patterns for this main game; changing to B, C or D changes what the species wants, not where it is allowed to live.
Take one habitat and one animal
Check the animals before choosing
If all four display animals are the same species, set all four aside and draw replacements into their slots. Repeat if all four match again. If exactly three match, you may set aside and replace just those three, once per turn. These resets cost nothing and never replace habitat tiles. Keep wiped animals outside the bag until the reset sequence is complete, then return them and mix the bag.
Choose a pair, or spend a nature token
Normally take one of the four fixed tile-and-animal pairs. Before placement, you may return a nature token to the supply to take any displayed tile with any displayed animal instead. Alternatively, spend one to replace any chosen number of displayed animals, leaving all habitat tiles in place; set removed animals aside, draw replacements into their same slots, resolve any resulting four-of-a-kind and an unused optional three-of-a-kind reset, then return wiped animals to the bag. A paid refresh does not also buy a free choice of tile and animal: spend another nature token to break the pairing. Multiple nature tokens may be spent during this selection phase. Do not refill draft gaps until after placing your chosen pieces.
Add the habitat
Rotate the new tile as you choose, then put it edge to edge beside at least one hex already in your landscape, including a starter hex. It cannot overlap another tile. Terrain edges may mismatch: matching them earns habitat points but is not a placement requirement. Once committed, tiles stay in position and orientation. Filling a hole is allowed if the hex fits without overlap.
Place the animal or return it
Put the chosen animal on any empty hex in your landscape that shows its species icon, including the new tile or a starter hex. Each hex holds at most one animal. You may place the two drafted pieces in either order; placing the habitat first makes a newly available space easier to see. Do not move existing animals. If you have no legal space, or deliberately do not want the animal, return it to the bag. You still keep and place the habitat.
Collect a nature token and refill
When you place the matching animal onto an empty keystone hex, take one nature token from the supply. Keystones have one habitat and one animal choice, identified in the booklet; check the keystone marking rather than judging a nearly covered tile. Merely adding the habitat earns nothing. The nature token just earned comes after drafting and cannot change that completed draft. Refill the empty tile slot from a face-down stack and the empty animal slot from the bag, keeping all other display positions fixed. Play passes clockwise.
Stop after everyone's twentieth turn
When a player finishes a turn and there is no face-down tile to refill the taken habitat, stop immediately and score. With the correct starting tile count, every player has taken exactly 20 turns. Each landscape contains its three starter hexes plus 20 ordinary hexes. Three unchosen habitats remain in the display: do not keep drafting them, and do not start an extra round.
Point to a displayed forest tile paired with a salmon. Say: 'I can add this forest to my forest edge and put the salmon on an older empty hex with a salmon icon. The salmon does not have to live on the forest I just took.' Use an available real pair or describe it aloud; do not rearrange the supply to make the example. Ask the next player to identify an empty legal animal space before beginning.
Score wildlife and all five habitats
Leave the landscapes intact while scoring. Record each person's five wildlife scores using the A patterns above. Then, for each of mountains, forests, prairies, wetlands and rivers, find that person's largest connected area and score one point per hex in it. A connection must cross an edge where that same habitat meets itself. Two forest regions of sizes three and four score four, not seven. Score one largest area for each of the five habitat types, not only the single biggest area overall.
Count each starter hex individually. A split habitat hex counts as one hex toward each of its two habitats, provided each side connects appropriately to that habitat's area. A whole-habitat hex still counts as one, not two. Animals and empty spaces do not block habitat connections.
Compare players' largest-area sizes separately for each habitat. In a two-player game, the larger area earns two bonus points; a tie earns one each. In a three- or four-player game, a sole largest earns three and a sole second-largest earns one. If two tie for largest, award two each and nobody else gets a bonus. If three or four tie for largest, award one each and nobody else gets a bonus. A tie for second earns no bonus. For example, forest sizes 8, 6, 6 award 3, 0, 0 bonus points.
Add one point per unused nature token. Your total is wildlife + the five habitat-area scores + habitat bonuses + unused nature tokens. Highest total wins. If totals tie, compare unused nature tokens; the most wins. If still tied, share the victory. Repacking starts only after the table agrees on the scores.
Keep the draft and the scoring understandable
Let one person teach the game and ask another experienced player to check for omissions afterward. Keep jokes about animals separate from point rules. Show a good bear pair and explain that a third adjacent bear breaks it; then point out one habitat connection. Invite questions about the visible scoring cards before the first choice. A short discussion is useful; taking over another player's landscape is not.
People differ on how much thinking time the puzzle needs. While waiting, look for one habitat you could extend and one animal pattern you could improve, then adapt to the actual supply on your turn. Keep the four pairs aligned so nobody accidentally takes a tile with the wrong animal. Wait until the active player has finished placement and refilled before drafting; overlap is a house pacing choice, not a rule assumed here.
Salmon clarification: the printed booklet describes nonbranching runs but leaves a confusing edge case. For this guide's host ruling, identify every salmon touching three or more other salmon in the completed landscape. Exclude those offending tokens from salmon runs, then score the remaining connected runs. Identify all offenders first, using the original layout; do not remove one and then recalculate who qualifies. Those tokens remain salmon for other wildlife scoring, including a neighboring fox. This follows the designer-attributed clarification linked in Sources. It is not a license to exclude arbitrary salmon or split bear groups.
A fox counts species, not animal quantities; a hawk beside another hawk fails A even if both sit on mountain tiles. Use the printed icons and terrain boundaries, not what the habitat looks as though it should support. Nature tokens refresh animals, never terrain. A fifth qualifying bear pair and an eighth-or-more qualifying hawk do not extend their printed scoring caps.
For a bumped component, this guide suggests restoring a position everyone agrees was established. For an illegal placement caught before the next draft, correct the current move with the same drafted pieces; if no animal space works, return the animal. For a late mistake with an uncertain history, pause, consult the booklet and agree a visible remedy together before continuing. These correction suggestions are house practice, not official penalties. A seated tabletop game still needs readable icons, room, reach and component handling; confirm the group's needs rather than assuming accessibility.
Already know the game?
Ideas & Twists
Choose a variation together before you start.
Cascadia · See main rules
Official simplified option, hosted for adultsOne wildlife puzzle
Replace the five A cards with the base box's single Family Variant scoring card. Every species uses the same rule: score each complete edge-connected group of that species in any shape, with a group of one worth 2, two worth 5, and three-or-more worth 9. A connected group of five is one group worth 9, not a pair and a triple. Use normal setup counts, drafting, placement, nature tokens and 20-turn finish. This hosted version selects the booklet's option to omit habitat majority bonuses; still score your largest area in each of the five habitats and unused nature tokens. Highest total wins; most unused nature tokens breaks a tie, then share the win. This removes five different wildlife patterns for an easier first teach; it does not add players.
Cascadia · See main rules
House challenge based on an official achievement restrictionMatch one habitat edge
Before setup, agree that each new habitat must touch at least one existing edge with the same terrain on both sides. Other touching edges may mismatch. You still add exactly one tile per turn and use normal drafting, wildlife A cards, nature tokens, scoring, finish and ties. Check for a legal placement before drafting; spending a nature token to choose another tile is allowed. If none of the four habitats can be legally added, use this explicit house fallback: take a normal pair, add its habitat with ordinary edge contact, return the drafted animal to the bag without placing it, and gain no keystone reward that turn. Refill and continue. The matching restriction is from the booklet's achievements; the fallback is a STUDplay house suggestion so the group can finish a standalone game. Do not record that game as passing the official restricted achievement if the fallback was needed.
Cascadia · See main rules
Official achievement restriction used as a standalone challengeAnimal homes one turn later
Keep the main game, but never place your drafted animal on the habitat you drafted that same turn. It must go on an older empty hex showing its species, including starter hexes. You may still place the animal and habitat in either order, earn a nature token on an older empty keystone, or return an unwanted or unplaceable animal to the bag. Preview an older legal space before picking a pair; a nature token can change your draft but cannot waive this restriction. Setup counts, A wildlife scoring, habitat scoring, bonuses, nature points, 20-turn finish and tie rules stay the same. No extra gear or players. This turns empty older habitats into something to plan for, rather than guaranteeing every animal a newly drafted home.
About this guide
Original physical English Cascadia base game, publisher booklet ©2021, hosted with all five A cards and individual 2–4-player play. Primary PDF pages 3–9 and 11 supply components, main rules and scoring; pages 10 and 14 supply simplified wildlife scoring and restrictions. The publisher also supports solo play, but it changes supply removal and habitat bonuses and is outside this main format. Landmarks supports additional players with expansion components; no expansion rule is imported. Salmon exclusion and overpopulation after a paid refresh follow designer-attributed clarifications accessed through Mira, with matching indexed forum excerpts; direct BGG pages returned empty text/403, so these are explicitly indirect verification, not a claimed full primary-forum read. Match-one-edge fallback, bump/error remedies and teaching/pacing advice are house suggestions. The image is an original generated illustration, not evidence of a real playtest.
Ready for something different?
Find another game →