

The quick version
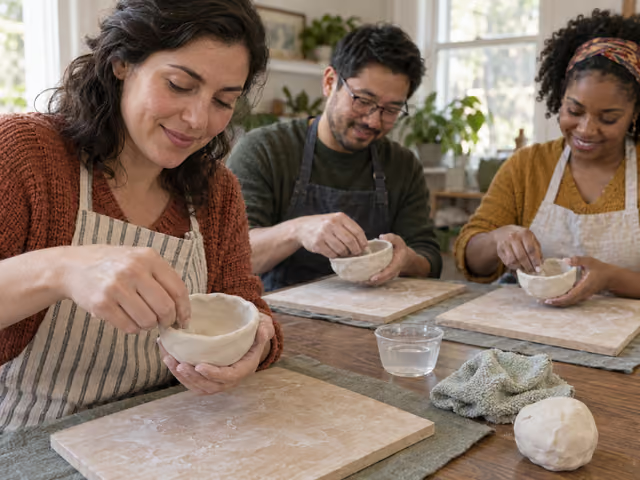
Give everyone one quarter-tub portion of white Crayola Air-Dry Clay and a protected work board. Roll a ball, press a thumb partway into its center, then gently pinch and rotate until it becomes a low open bowl with an intact bottom. Smooth fresh cracks, keep the walls fairly even, and add fingertip texture if you want. Each maker shows their vessel before it stays on its labeled board to dry. There are no points or winner.
Saved on this device only — clearing your browser's cache or site data removes them (no account backup).
Choose the clay and prepare a place to dry
Host 2–6 people, including the host if they are making a vessel. Use Crayola Air-Dry Clay, white, in the 2.5 lb resealable tub. Check those words on the package: Model Magic, reusable modeling clay, polymer oven-bake clay and clay intended for kiln firing are different materials. This guide uses one clay type throughout. There is no wheel or sculpting kit to buy.
Divide a tub into four roughly equal portions, about 280 g each. Give each person one portion and keep unused clay closed in its original tub. One tub supplies up to four makers; open a second for five or six. The portion is a host allocation, not a manufacturer yield guarantee. Use the same portion for the demonstration and finished bowl; the host does not need extra clay.
Cover a stable table with a washable protective covering. Give each maker a rigid board lined with a removable protective sheet, such as baking parchment, so the wet vessel never dries directly on a household surface. Provide seats, one shared cup of water for fingertips, a damp cleanup cloth, and paper labels with a pen. Keep labels beside the boards, not pressed into wet clay. Protect clothing with an apron or washable clothes.
Before opening the clay, agree on a protected indoor place where every board can remain undisturbed, who will check drying, and how each maker will collect their piece. A shelf with room for the whole group is part of the setup. This session ends with shaped work, not dry work ready for a pocket or bag. If you cannot provide drying space, arrange it before starting.
Make one low pinch vessel
Start with a ball
Briefly squeeze and roll your portion into a smooth ball. Keep it in a cupped hand, or support it on your board if that is more comfortable. The host demonstrates each next action with their own clay; everyone may work at their own pace rather than taking timed turns.
Open the center
Press your thumb into the center to roughly two-thirds of the ball's depth. Leave a solid floor; do not push through. Imagine a small nest beginning to open. Cup the outside with your other hand so the ball stays supported.
Pinch, turn, repeat
Put the thumb inside and fingers outside. Gently squeeze the clay between them, rotate the vessel a little, and squeeze the next patch. Work around the lower wall first, then around the middle and rim. Several light passes give more control than one hard squeeze. Feel the wall between your fingers and thin thick patches gradually; do not pull the lip outward by itself.
Keep it low and even
Aim for a palm-sized open bowl, roughly 8–10 cm across, with walls and floor around 1 cm thick. These are beginner aiming points, not a measured judging rule; no ruler is required. Keep the floor intact and the walls fairly even. Stop widening before the sides sag or the lip becomes a paper-thin edge. Leave it as one continuous piece, with no added feet, handles or separate decorations.
Smooth and personalize
Rub across a fresh small crack with a fingertip. If the surface feels dry, barely dampen the finger and smooth again; do not pour water into the clay or soak the bowl. Support the outside while smoothing inside. Add shallow fingertip dots or a gently wavy rim if you like, keeping the same wall thickness. Set the bowl on its board and gently settle a small flat base so it rests upright.
Show it and finish
Leave each vessel on its board. Go around the table once; every maker names the piece and points out one choice they made. Speaking is optional: pointing is enough. Ask before touching anyone else's work. When everyone has shared or passed, label the boards and move them together to the agreed drying place. The making session finishes here. There is no score, winner, tie-break or race to finish first.
Show your own clay ball and say: 'My thumb opens the center, but leaves a floor. Then my thumb inside and fingers outside pinch one patch before I turn.' Show one gentle pinch. Friends continue with their own vessels rather than passing a single wet pot around.
Let it dry; keep it decorative
Let the vessel air-dry indoors on its protected board. Crayola gives general guidance of about 24 hours to become dry to the touch and about 72 hours to dry completely, with size and surroundings affecting the result. Those figures are not a promise for your vessel. A firm surface does not establish that its thicker base is fully dry. Allow longer if needed; do not reshape a stiffening piece.
Do not put this clay in an oven, microwave or kiln, or near an open flame. A household oven does not turn it into fired pottery. Do not make it a candle holder. Keep this project away from direct heat and leave it to dry naturally. Move the rigid board rather than lifting the soft bowl by its rim; collect it only after thorough drying.
The bowl may stay unpainted. Painting is an optional later activity: wait until it is thoroughly dry, then use compatible acrylic, tempera or watercolor and follow that paint's directions. Paint, brushes and varnish are not needed for this session. Sealing does not make Crayola Air-Dry Clay waterproof. Keep the finished vessel indoors for dry decorative objects only. No food, drinking water, wet plants or other liquids, even after painting or sealing.
If you want usable ceramic tableware another time, book a ceramic studio first and have it specify the clay body, drying, kiln firings and suitable food-contact finish. Studio acceptance and food-contact suitability require confirmation for that complete process. Do not take these Crayola pieces in for firing or substitute an unknown clay into this guide.
Help beginners without taking over
Judge progress by a continuous hollow form, an intact floor and a base that rests on the board. A lopsided bowl still meets the project. This is shared making, so aesthetic disagreements do not need a vote. Give advice when invited and ask before handling a friend's clay. Nobody has to accept a correction just to make all the vessels look alike.
If a soft wall starts to slump, stop stretching it and gently bring it inward while supporting both sides. For a hole or major collapse while the whole portion is still pliable, squeeze it back into a ball and start a smaller opening. That is a normal restart, not a penalty. Stop working a piece that has become stiff; repeatedly bending it or attaching wet clay to drying clay can create further weak spots. A large crack discovered after drying is a reason to remake, not a promise that a patch will restore strength.
People may compare designs, but do not promise identical results or crack-free drying. Forum advice often mixes different clay products; do not import another clay's oven, firing or waterproofing instructions. Let someone pause or stop comfortably. Seated work still needs hand pressure, dexterity and tolerance of the material; discuss individual needs rather than advertising universal access.
Pick up scraps while wet and wipe boards and the table with a damp cloth. Avoid creating dust by sanding dry pieces or sweeping dried residue. Wash hands afterward. Store only unused clay that has not had extra water added, following the tub directions; keep wet worked scraps out of that reserve. Confirm the labeled drying handoff before people leave so no one has to carry a soft vessel loose.
Already know the game?
Ideas & Twists
Choose a variation together before you start.
Clay handbuilding · See main rules
House suggestion · 2, 4 or 6 makersMake a friend's commission
Use pairs instead of independent design briefs. Each person asks their partner for one dry-trinket purpose and one visual preference, such as a round opening with three fingertip dots. Make one vessel from your own original portion for that partner; keep the main pinch technique, low size, single-piece construction and decorative limits. At the gallery, explain how you interpreted the request. There is no rating or winner. Decide whether to exchange only after both makers agree; exchanges happen after thorough drying. An odd-sized group should choose the main format or another twist. No extra clay or equipment is required.
Clay handbuilding · See main rules
House suggestion · interpretation challengeShape a word, then let friends guess
Before opening the clay, write one familiar word on each person's existing paper label, such as calm, storm, welcome or mountain. Hide the word under the board while working. Interpret it through the bowl's silhouette, rim and shallow fingertip pattern, keeping the main portion, walls, single-piece construction and use limits. At the gallery, each maker invites one guess from each willing friend, then reveals their word and explains one design choice. Guesses earn no points and a missed guess does not invalidate the piece. Put the maker's name back beside the board and complete the normal drying handoff. No extra clay or materials are required.
About this guide
Reviewed October 2, 2026. This is an original, unscored friend-group project, not an official game or the boxed Sculpting Station project. AMACO supplies the basic thumb opening and pinch-and-rotate technique; Crayola governs this exact clay's drying and care. The 2–6 hosting range, quarter-tub allocation, size targets, gallery, repairs and three twists are host suggestions. The old kit's overnight painting language is not a readiness guarantee; the current drying FAQ explicitly allows variation. No manufacturer endorsement, tableware suitability, crack-free result or numerical session-duration guarantee is claimed.
Ready for something different?
Find another game →