

The quick version
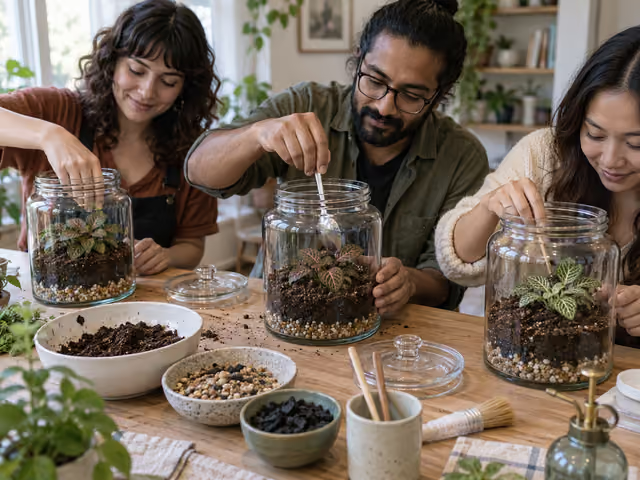
Give everyone a clean, wide-mouth jar and one small Fittonia. Add washed gravel, a thin charcoal layer and lightly damp potting mix. Plant at its existing depth, leaving space around the leaves, and brush the glass clean. Check moisture before adding water. Finish with a round of show-and-tell and a plan for indirect light, moisture checks and trimming; close each jar once its foliage is dry.
Saved on this device only — clearing your browser's cache or site data removes them (no account backup).
Choose the plant, jar and home before buying
This guide hosts 2–6 makers indoors, seated at a table, with one jar per person. Use a clear, untinted, stable glass jar with a removable lid, roughly 3–5 litres and about 25 cm tall. A mouth at least 10 cm wide makes spoon work and later pruning easier. Check actual fit: the jar needs room for the layers, root ball and leaves below the lid. A volume label alone is not enough.
Choose one healthy, small Fittonia albivenis (nerve plant), preferably a compact selection in a roughly 5–6 cm nursery pot. Use nursery-grown plants, not collected woodland material. Leave room for growth; choose a smaller specimen rather than crushing leaves against the glass. This is a humid, lidded system. Cacti and succulents need a different environment and are unsuitable here. It contains plants only; adding animals is a separate project.
Per person: one jar and lid, one plant, clean washed gravel for a roughly 2.5 cm base layer, horticultural or aquarium charcoal for a roughly 6 mm layer, and fresh peat-free houseplant potting mix for about 5 cm above it or enough to surround the root ball. The centimetres are layer depths, not liquid volumes. Avoid outdoor garden soil, barbecue charcoal and strongly enriched mixes.
For the table: a washable covering or individual trays, bowls for the materials, a spoon and chopstick per maker, a small jug of water, mist sprayer, a clean soft brush or cloth for glass and foliage, clean snips for any damaged or crowded growth, and a bowl for plant waste. Have soap and water available for cleanup. Bring a padded box or tote if jars will travel; keep them upright. Decorative stones are optional in the main format.
Before the gathering, wash and rinse the jars and tools, inspect glass for damage and check plants for pests, dead leaves or decay. Set out enough materials for every jar. Lightly moisten dry potting mix in a bowl so it is damp but does not drip when squeezed. Fittonia needs a warm home above 17°C (63°F), out of cold drafts, with bright indirect light. Each maker should identify a suitable spot away from direct sun and radiators before planting.
Build your jar in stages
Try the plant against the empty jar
Each maker places their plant beside the jar and checks the available height and width. Explain that the lid comes off for care. Everyone chooses a front viewing side before adding material. Work on your own jar; offer help before reaching into someone else's.
Add the base and root space
Spoon in about 2.5 cm of washed gravel, then a thin layer of horticultural charcoal, about 6 mm. Add around 5 cm of lightly damp potting mix, increasing it if needed to cover the root ball. The gravel is a lower collection space, not a drainage outlet: excess water stays in this jar. Charcoal does not make overwatering safe.
Plant at the same depth
Make a hole, gently slide the Fittonia from its nursery pot and loosen the outer roots if tightly packed. Set its root ball in the hole with the stem base at the same level as before. Spoon mix around it and gently firm with the spoon or chopstick. Keep leaves above the mix, with space from the walls and lid. Remove damaged foliage with clean snips; if it still cannot fit, change the plant or jar rather than forcing it.
Check moisture and clean up
Brush loose soil from leaves and wipe the inside glass with a clean cloth. If the mix is already evenly damp, add no more water. If parts are dry, add a little water to the soil at a time using the spoon or mister, then inspect again. Stop before saturation or standing water. Do not fill the gravel layer as a reservoir. Let wet foliage dry before replacing the lid.
Share and hand over care
Once everyone has planted, each person shows their jar and names its intended home and first care check. There are no turns, points, winner or tie-break: this is a making session. Finish when each jar is stable, tidy and allocated to someone who understands its care, and the shared tools and table are cleaned. If leaves are still wet, leave that lid off until dry; a jar can travel upright with its lid fitted, then be checked on arrival.
Use your own jar to show a spoonful of lightly damp mix and the plant's original soil line. Let everyone do the same stage in their jar, then help anyone who asks. The group can progress at different speeds; delicate roots do not need a countdown.
Balance moisture, then keep watching
Inspect the jar daily during the first few days. Some condensation can appear and clear as temperatures change. If the glass stays heavily wet, water runs down continuously or the soil looks saturated, remove the lid to let excess moisture evaporate; inspect again before closing. Venting time depends on the jar and room. Keep the jar in bright indirect light throughout. Direct sun can overheat a glass enclosure.
Once settled, check it regularly, including soil moisture, leaves and any new growth. Water when the mix is becoming dry, in small additions to the soil. Use reduced condensation as a reason to inspect, not an automatic order to water. A drooping Fittonia with dry mix may need water; a drooping plant in wet mix needs investigation instead. Even a settled, lidded jar can need opening for water or pruning. Check before watering rather than following a fixed weekly or monthly schedule.
Remove fallen or decaying leaves promptly. If mold appears, remove affected debris and reduce excessive wetness; if the plant itself is rotting or a problem persists, remove it and seek plant-care advice before replacing it. Do not add household mold remedies or animals as an instant cure. Use clean snips to trim growth approaching the glass or lid, and remove the cut pieces. A plant that repeatedly outgrows its space belongs in a larger container or a normal pot.
Skip routine fertilizer at the start; rapid growth will crowd the jar. Dust the outside without spraying cleaner into the enclosure. The terrarium is a living planting that may need adjustment, pruning or replacement, rather than a permanently finished ornament.
Help with the plant, leave the design to its maker
Set shared supply bowls within easy reach and pass them rather than stretching over glass. A small-room setup works when every person has a clear working area and materials fit on the table. Spoon work can be seated and softly conversational. Ask whether everyone can reach the supplies and see the delicate planting work; adjust seating and offer help with fiddly steps when wanted.
If someone wants a different plant, check its light and moisture needs before swapping. A succulent cannot share this closed Fittonia format. If the group disagrees about which arrangement looks best, let each owner choose: aesthetics are not scored. If someone wants to add more water, check the mix together first; do not settle it by majority vote or add water to another person's jar.
Record the plant name and care instructions on a paper note if helpful; the guide itself can be read aloud from a printout. Wash hands after handling planting materials, keep supplies away from food and use a stable working surface. Stop using chipped glass; the host should isolate it and handle cleanup before anyone continues.
Already know the game?
Ideas & Twists
Choose a variation together before you start.
Terrarium building · See main rules
House formatBuild one jar as a pair
Replace one jar per person with one jar per pair. With an odd count, the final person makes their own. For each pair, one person adds the gravel and charcoal while the other prepares the planting hole; switch spoon work for planting and cleanup so both participate. Keep the same single-plant, moisture and space requirements. Before starting, agree who will take the jar home and care for it. Finish with both people explaining one care check; there is still no scoring.
Terrarium building · See main rules
House design suggestionStone landscape brief
Add one or two small, clean, smooth stones per jar and choose a shared landscape idea such as a curved path or a hillside. Sketch it verbally before planting; make only a shallow slope that still covers the root ball and keeps foliage away from glass. Lay stones on exposed soil without burying the stem or covering the entire surface, so moisture remains inspectable. Everyone explains how their layout answers the brief. Keep the same plant, watering and finish; do not rank designs or add wood, animals or a different plant system.
Terrarium building · See main rules
House follow-up sessionReturn and refresh
Meet again with these same Fittonia jars and the cleaning tools, snips and spare mix from setup. Replace new-jar construction with a condition check: each owner reports their light, soil moisture and growth, then removes fallen leaves and trims any growth approaching glass. Add no water to already damp soil. Move an oversized healthy plant to a separate pot rather than forcing it back; set aside a diseased jar for diagnosis instead of sharing its material. Each owner chooses one care adjustment or states why none is needed. Finish after every jar has a care plan and tools are cleaned; this is not a competition or a scheduled watering round.
About this guide
RHS and university extension guidance inform the closed Fittonia planting and care. The jar size, single-plant project and group variations are suggestions. Gravel does not create drainage holes; adjust moisture by inspecting the actual jar, soil and plant.
Ready for something different?
Find another game →