

The quick version
Prewash one white cotton shirt per person. Scrunch and bind the damp fabric, then dye both sides over a catch tray. Leave tied for 30 minutes, heat each damp bundle using the microwave instructions below, then treat it in the measured fixative bath. Rinse while still tied, remove the bands, wash and dry. This is a craft gathering with no points or winner.
Saved on this device only — clearing your browser's cache or site data removes them (no account backup).
Prepare a dye station and a finishing station
This guide hosts 2–6 adults, including the host, each making one plain white 100% cotton T-shirt with no metal fittings and a care label allowing hot-water washing. Cold-wash-only or dry-clean-only shirts do not fit this process. Use Rit All-Purpose liquid dye, with a microwave finish and a separate Rit ColorStay Dye Fixative sink/bucket treatment. DyeMore, fiber-reactive kits and other fibers need their own directions.
- For each person: one prewashed cotton shirt, a pair of protective gloves and rubber bands sufficient to hold the bundle. Give every simultaneous maker a baking rack inside a catch tray, a protected work space and somewhere to leave a wet bundle.
- Shared color supplies: two or three chosen All-Purpose liquid colors, salt, hot tap water, a measuring cup and tablespoon, mixing jug and spoon, a funnel if needed, and one hot-water-compatible squeeze bottle per color. Prepare additional solution at the same ratio as needed; a single bottle is not a promised six-shirt supply.
- Finishing supplies: ColorStay fixative, a scale for the dry fabric weight, a plastic bucket large enough to submerge a bound shirt, hot and cool running water, stirring spoon/tongs, microwave, microwave-safe plastic wrap and a microwave-safe plate or container, paper towels, heat-resistant mitts, scissors, mild laundry detergent, washing facilities and a drying place. Keep dye tools separate from food preparation.
- Cover the table and nearby vulnerable surfaces with plastic. Keep food away; use clothes you can stain. Name each person's tray with removable tape and a pen. Agree who will supervise heat treatment and help finish each shirt.
Before guests arrive, wash the shirts in warm soapy water without fabric softener, and weigh them dry for the fixative calculation. Rewet them when starting and squeeze away dripping water. Set out the product labels, clear the route to the sink and microwave, and check that the selected shirt and wrapping can safely use this heat method. Try a spare matching fabric swatch beforehand if color matters.
Bind, color and finish each shirt
Make a scrunched bundle
Put on gloves and spread a damp shirt on the protected table. Push sections toward each other into irregular folds, then hold the compact bundle with rubber bands. Tight areas resist dye and leave lighter marks. Keep the fabric bound through heating, fixative treatment and the first rinse.
Mix the chosen colors
For each color, shake the liquid dye bottle, then mix 2 tablespoons (30 mL) dye with 2 cups (about 470 mL) hot tap water and 1 tablespoon salt. For Rose Quartz or Tan use 1 tablespoon dye instead. Transfer carefully to its squeeze bottle, leaving space for the cap. Guests can share bottles; keep them over trays.
Dye both sides
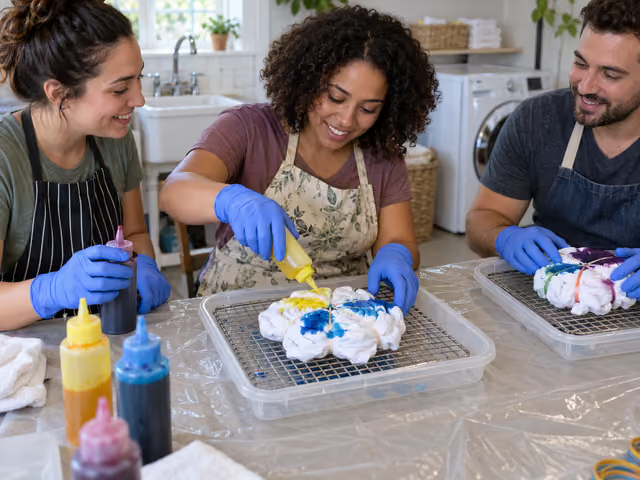
Rest the bundle on its rack above the tray. Squeeze color into selected areas slowly, then turn the bundle and color the other side. Leave some fabric undyed if you want white patches. A rack keeps runoff from recoloring the underside. Everyone works on their own shirt; pass a shared bottle only after capping it. Let each completed bundle sit tied for 30 minutes.
Heat one damp bundle at a time
The host checks that the cotton is still damp and contains no metal. Wrap it with microwave-safe plastic wrap, sealing the edges, and put it on a microwave-safe plate/container with paper towels to catch leaks. The wire rack stays at the dye station. Microwave on high for up to 2 minutes, checking after 1 minute for melting or trouble and watching throughout. Stop immediately if it dries, scorches or the wrapping deteriorates. Do not extend the cycle to chase brighter color. Use mitts to remove it, let it cool, then open the wrap away from your face because steam can burn.
Use the measured fixative bath
After heating and cooling, before rinsing, make a fresh ColorStay bath. For 1 pound (about 0.5 kg) of dry fabric use 1/2 cup (120 mL) well-shaken fixative in 3 US gallons (about 11.5 L) hot tap water; scale both quantities proportionally to the recorded dry weight. Keep the shirt bound, immerse it, and gently move it through the bath intermittently for 20 minutes. The bucket must allow immersion and movement. Treat different people's shirts separately with fresh solution so loose dye from one does not affect another.
Rinse, reveal and wash
Rinse the still-bound shirt with cool water until the runoff begins to clear, preferably flat on the rack over the sink so runoff does not streak through white areas. Remove the bands carefully, cutting the bands rather than the cloth if necessary, and unfold. Following the selected fixative bath's finishing directions, wash in warm water with mild detergent, rinse and dry as the garment care label allows. Wash new dyed shirts separately from other laundry at first. Wet color is not the final dry result; allow drying before judging the pattern.
Finish together
Share the patterns if people want to, then clear the stations and clean tools and stained surfaces according to their product instructions. Everyone keeps their own shirt. There are no scores, ties or best-shirt vote in the main session. If laundry or drying is still underway, the host agrees with each person how their labeled shirt will be finished and returned; an unrinsed bundle is not ready to wear.
Keep the reveal enjoyable and the method consistent
Invite each maker to choose a palette before opening bottles. Demonstrate the first fold on your own shirt, and leave space for different results rather than correcting everyone's design. Ask before touching another person's work or photographing them. Offer help with bands and bottle handling; the sink and heating steps mean this complete format is not wholly seated.
Agree before starting that this session uses one dye system. Salt in the color mixture does not replace ColorStay; vinegar or a soda-ash soak is not this finish. A 24-hour room-temperature rest from another kit is not a substitute for the selected Rit heat step. If a guest brings a synthetic shirt, metal-trimmed item or different dye, save it for a separately prepared project instead of improvising.
A fuzzy edge or lighter dry color is a result to learn from, not a rules dispute. Continue rinsing and washing to remove loose dye even when some color comes out. For unwanted blending, check runoff, dye placement and how tightly the shirt was bound; do not compensate by unsafe reheating. If labels or equipment cannot support the selected heat procedure, pause that shirt and follow the manufacturer's suitable alternative later. Keep the process supervised and take turns at the heat and rinse stations.
For later care, follow the garment label and dye-product recommendations. As a host precaution, use a cool mild-detergent wash and keep the shirt separate while it still releases color; do not assume fixative makes it safe in every mixed load. Dry as the garment label allows.
Already know the game?
Ideas & Twists
Choose a variation together before you start.
Tie-dye session · See main rules
Manufacturer folding optionSpiral reveal
Replace the scrunch with a spiral: lay the damp shirt flat, pinch the desired center, and rotate it while guiding the folds into a flat disk. Cross rubber bands over the disk to hold wedges in place. Apply selected colors to wedges on both sides. Keep the same cotton, dye recipe, 30-minute rest, heat, separate fixative bath, rinse and laundry finish; the folding and color placement are the only changes.
Tie-dye session · See main rules
Manufacturer folding optionStriped folds
Replace the scrunch with accordion folds about 2–3 inches wide, running vertically or diagonally across the damp shirt. Bind the folded strip at similar intervals. Color alternating sections on both sides, leaving selected bands/sections undyed if desired. Do not unfold early: use the same rest, heating, fixative, rinse and wash sequence as the main session. The folds change the pattern, not the finishing chemistry.
About this guide
This method uses Rit All-Purpose liquid color on plain cotton, microwave heat, then the separately specified ColorStay sink/bucket finish. Follow the current product labels and equipment instructions. Other dyes, fibers and kits can require different mixtures, temperatures and waiting times. The social format and two-color prompt are host suggestions.
Ready for something different?
Find another game →